Libreboot on a T440p


The T440p as of writing, is the most powerful T series laptop that libreboot supports. All info here was found on the libreboot and coreboot websites.
Building the Libreboot/coreboot image
Before you flash or do anything, it is incredibly important you back up your current bios to somewhere safe. These bios files are unique to the motherboard, so if you lose them you are out of luck if there are some patches to the blobs in the bios image. You can only update these blobs using the original bios.
Flash Configuration
I am using a Raspberry Pi 4B 4GB with a SOIC8 Test Clip to flash my device. You can also use USB programmers, though I would try to avoid the CH241A as its 3.3v mode uses 5v for data which could fry your chip.
NEVER ATTACH/REMOVE CLIP WHILE IT HAS POWER.
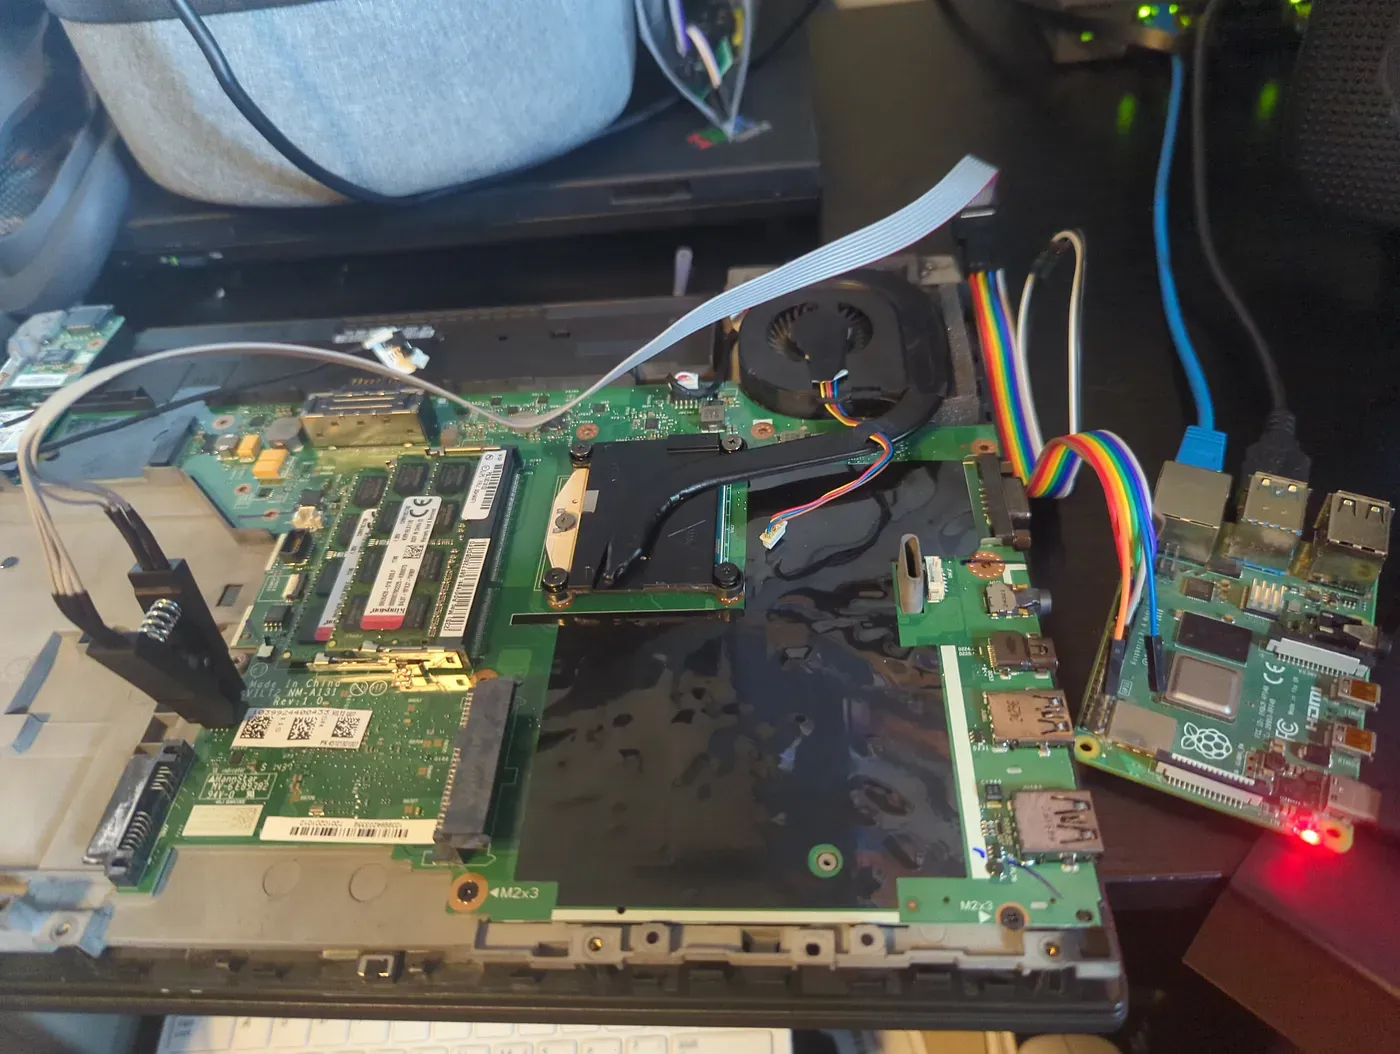
For the pin-out of the clip I used this diagram from this blog.
Clip Pin-out
  MOSI  5 --|  |-- 4  GND
   CLK  6 --|  |-- 3  N/C
   N/C  7 --|  |-- 2  MISO
   VCC  8 --|  |-- 1  CS
Edge of pi (furthest from you)
L CS
E |
F +--------------------------------------------------------------------------------------------------------+
T | x x x x x x x x x x x x x x x x x x x x |
| x x x x x x x x x x x x x x x x x x x x |
E +--------------------------------------------^----^----^----^---------------------------------------^----+
D | | | | |
G 3.3V MOSI MISO | GND
E (VCC) CLK
Body of Pi (closest to you)Raspberry Pi/Flashing Device Setup
First install dependencies. I'm using Raspberry Pi OS, which is based on Debian.
sudo apt install flashrom
# RASPBERRY PI ONLY
# Enable SPI [Interfacing Options>SPI]
sudo raspi-config
Next clone and enter the repository.
git clone https://codeberg.org/libreboot/lbmk
cd lbmk
Testing and backing up original BIOS.
Power down the pi and attach the clip to the top chip. Once firmly attached, power up the pi and run the following commands.
flashrom -p linux_spi:dev=/dev/spidev0.0,spispeed=512You should see something similar to below. If not, make sure you have the clip attached correctly.
flashrom p1.0-76-g291764a on Linux 4.14.34-v7+ (armv7l)
flashrom is free software, get the source code at https://flashrom.org
Using clock_gettime for delay loops (clk_id: 1, resolution: 1ns).
Found Winbond flash chip "W25X80" (1024 kB, SPI) on linux_spi.
No operations were specified.
Once you have it reading the chip, you can back up the BIOS with the following command.
flashrom -p linux_spi:dev=/dev/spidev0.0,spispeed=512 -r 4mb_backup1.binRun the same command again but change the output file to 4mb_backup2.bin.
flashrom -p linux_spi:dev=/dev/spidev0.0,spispeed=512 -r 4mb_backup2.binRun a diff command to make sure the bios was backed up correctly. The diff command should return NO result, as it is looking for any differences between the files. If it does return a value, readjust the clip and try again.
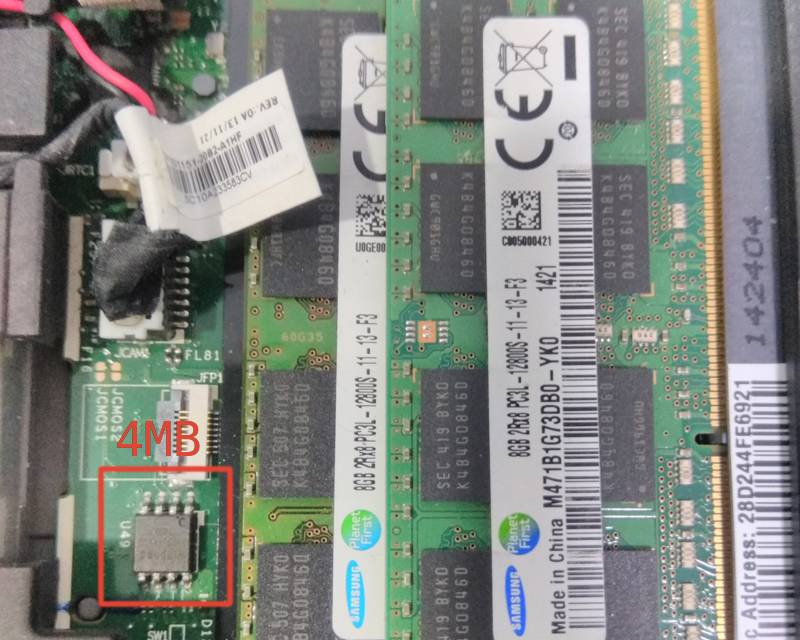
diff 4mb_backup1.bin 4mb_backup2.binOnce finished, power down the pi, and attach the clip to the bottom chip. Keep in mind this chip in inverse the other one. So you will need to flip the clip.
Once finished, run the same commands.
# Make sure the chip is detected
flashrom -p linux_spi:dev=/dev/spidev0.0,spispeed=512

# Once detected backup the bios twice to two files.
flashrom -p linux_spi:dev=/dev/spidev0.0,spispeed=512 -r 8mb_backup1.bin
flashrom -p linux_spi:dev=/dev/spidev0.0,spispeed=512 -r 8mb_backup2.bin
# Finally check to make sure there is no differences between the two files.
diff 8mb_backup1.bin 8mb_backup2.bin
Now we just need to combine these two bin files into a singular file so, we can pull some blobs from it later.
cat 8mb_backup1.rom 4mb_backup1.rom > full_backup.binExtract Firmware Blobs and inject into our Libreboot ROM
Make sure you are still in the lbmk repository. Run the following command to extract the blobs.
./blobutil extract t440pmrc_12mb full_backup.binDownload the libreboot ROM for the t440pmrc_12mb here.
Inject the blobs into the ROMs you downloaded.
./blobutil inject /path/to/libreboot_VERSION_t440pmrc_12mb.tar.xzAt the end of the script, it should tell you where the ROMs are located. You need to split the ROM for your laptop into the 4mb and 8mb images.
dd if=libreboot.rom of=top.rom bs=1M skip=8
dd if=libreboot.rom of=bottom.rom bs=1M count=8
Flashing the ROM
Now attach the clip to the top chip and flash the top.rom to it.
flashrom -p linux_spi:dev=/dev/spidev0.0,spispeed=512 -w top.romPower down the pi and replace the clip on the bottom chip. Power the pi back up and run the following command.
flashrom -p linux_spi:dev=/dev/spidev0.0,spispeed=512 -w bottom.romIf they both finish and reported VERIFIED, then you should now have a T440p with Libreboot!